Axis and CCTV lighting company Raytec held a series of test nights throughout the winter months of 2011 and 2012. The test nights were designed to help security professionals tackle some of the most common practical issues when using lighting in conjunction with network cameras to achieve high performance CCTV images at night. Below is a brief summary of the findings of the tests.
Axis and CCTV lighting company Raytec held a series of test nights throughout the winter months of 2011 and 2012. The test nights were designed to help security professionals tackle some of the most common practical issues when using lighting in conjunction with network cameras to achieve high performance CCTV images at night. Below is a brief summary of the findings of the tests.
Lesson 1: Mounting and set-up
Before you set your cameras rolling, it is vital that you have correctly mounted and aligned not just your cameras but your illumination too, for the best possible CCTV performance at night.
1.1 Mounting your camera
Cameras need to be placed in all kinds of locations and this requires a large number of variations in the type of mounting. Common mounting solutions include ceiling mounts, wall mounts, corner mounts, pole mounts and parapet mounts (used for roof-mounted housings or to raise the camera for a better angle of view).
1.2 Positioning a fixed camera in a housing
When installing a fixed camera in an enclosure, it is important that the lens of the camera is positioned right up against the window to prevent any glare. Otherwise, reflections from the camera and the background will appear in the image. To reduce reflection, special coatings can be applied on any glass used in front of the lens.
1.3 Mounting your lighting
Mount the illuminator first. Position the illuminator adjacent to camera and point it towards the scene. Mount the illuminator at least 1 m away from the camera (space dependent) to avoid reflection into the camera. Lighting must be mounted approximately 1 m below dome cameras.
Do not position PSU photocells facing the illuminator or other direct light sources. Photocells monitor ambient lighting conditions. Mount the PSU on wall/flat surface with glands facing down. Flat, adaptor plate brackets are available for mounting illuminator and PSU on a pole.
Connect the illuminator to the PSU. Installers can extend or reduce illuminator cable length using appropriate cable and weatherproof box.
TOP TIP
Align your illumination with your camera at night for optimum image performance. Adjust vertical and horizontal angle using adaptive Illumination to match the illumination to the camera field of view.
Lesson 2: Match your illumination to the lens angle
The reality is that most cameras need a certain level of lighting to produce an effective image at night. Even the most advanced cameras require dedicated lighting to produce images with the ability to detect, identify or recognise people or objects in the scene.
It is critical to have the right angle of illumination, matched to the camera field of view. A narrow light on a wide angle can produce a bright spot on the screen and wide-angle illumination on a narrow scene results in light wastage and reduced performance.
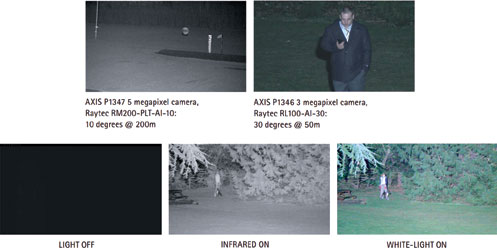
Raytec demonstrated this during the test nights with their RAYMAX Infra-Red and RAYLUX White-Light LED illuminators, showing lighting precisely matched to the field of view of the Axis cameras – producing even illumination across the entire scene, with excellent clarity and no dark spots (Figure 1).

TOP TIP: Night-time IR set-up, infrared and focus shift.
Focus shift is a potential issue encountered when setting up camera systems for 24-hour performance using infrared. The different wavelengths of visible light (400-700 nm) and infrared (700-1000 nm) create different focus points through the lens onto the camera chip. This can lead to a loss of image focus at night, particularly if the camera is set up during daytime operation. The degree of focus shift depends on a variety of factors:
Focusing the camera correctly for low light performance means the camera will be focused for IR with the aperture fully open. During daytime operation, the increased depth of field created by a closing aperture will counter the effects of focus shift. The best solution is to focus the camera using only infrared. This can be achieved by:
* Setting up the camera at night using infrared lighting.
* Using an IR pass filter over the camera lens.
TOP TIP: Choice of lens impacts the quality of image – PROs and CONs
PRO: A camera with an auto iris lens (like many of the Axis cameras) is the common choice for achieving high quality images for 24-hour surveillance in external scenarios. The auto iris opens and closes to allow the right amount of light to fall onto the camera chip dependent on whether it is day or night. Open at night to collect maximum light, more closed during daylight.
CON: Iris lenses can often be slightly bigger and more difficult to set-up.
PRO: Fixed lenses are often used for internal applications where light levels may be constant and can be set to the specific scene requirements. The smaller the F-stop setting on the camera is fixed at (1.4 is typical for night-time surveillance), the wider the iris, therefore more light is let into the camera and it produces better night-time images. The camera will use an electronic iris during the day (like a shutter) to avoid too much light causing overexposure (white out) on scene (used on Axis indoor network cameras).
CON: Fixed lenses are not suitable for day/night or changing light scenarios. The iris opening cannot be adjusted. To compensate for changes in light, some cameras will adjust exposure time or gain, which can lead to motion blur or noisy images.
(Aspherical lenses provide superior low light performance as they use more of the available light. While standard lenses can lose some light at the edges of the lens, aspherical lenses have a specialist front profile to catch all the light available. Low light applications can benefit from the use of an aspherical lens.)
Lesson 3: Lighting costs money – so do not waste it
Consider the running and maintenance costs of your system. Many installations use multiple 300 W or 500 W illuminations. These can be replaced with as little as 40 W of long life, cool running infrared or white-light LED illumination.
Not only does LED lighting have an inherently low power consumption, but it also lasts a lot longer – typically around 10 years and requires zero maintenance – compared to a halogen light which can last as little as 5 months. Over this 10-year period, there are significant savings to be made on energy consumption, running costs and labour.
Additionally, White-Light can be targeted and exactly where needed. It can also be activated via an external trigger on a timer, to provide lighting only when needed for a predetermined amount of time to further save on energy usage and light pollution. This is referred to as ‘Lighting on Demand’.
Lesson 4: Street lighting is not enough
Often, users of security systems may consider street lighting to be a good enough solution to fully illuminate a scene for capturing CCTV images at night. The user may be cautious about adding additional visible illumination on scene because of light pollution concerns. For this scenario, infrared illumination which is invisible to the human eye can be a very effective solution.
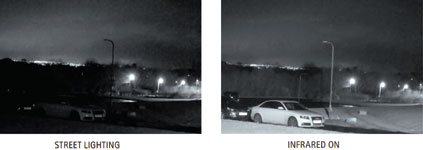
Axis and Raytec staged a practical demonstration to compare the effectiveness of street lighting to dedicated infrared illumination during image capture at night.
As shown on the left (Figure 2), the uneven illumination from street lighting, which is not designed for the camera field of view, is creating dark areas on scene and a grainy CCTV image with no detail. Now looking at the image on the right, the RAYMAX IR illumination, matched to the field of view of the camera provides an even output of illumination to achieve a clear crisp picture across the entire scene – with zero light pollution.

TOP TIP
If there is too much ambient light on the scene, or flashing lights nearby causing a disturbance to your CCTV image, using IR lighting with an IR bandpass filter lens on the camera will cut out the glare from all other ambient light apart from IR, for a crisp and clear, evenly illuminated black and white image.
Lesson 5: Excessive lux levels are not required
The test nights proved that high performance, low light camera technology such as the Axis Lightfinder, requires as little as 1 or 2 lux of effectively directed, colour corrected White-Light illumination. Many traditional ‘visible’ lighting solutions aim for high lux levels on the scene – this is not always required and it can often result in reduced image quality, excessive light pollution and excessive energy consumption. NB: Typical lux levels for CCTV are between 3 and 7 lux.
All cameras need light but have a responsibility to be greener. With the Lightfinder, users can minimise the amount of lighting units that are required on scene, saving further energy and money.
In addition to the filtering and sharpening set by the software used in all Axis camera technology, the Lightfinder technology incorporates a CMOS sensor with exceptional light sensitivity. The outstanding performance in low light is the result of the CMOS sensor combined with carefully tuned image processing, producing the best image quality possible with true life-like colour rendition and excellent resolution.
Traditionally CCD sensors have always offered the best sensitivity to light. Now, with advances in CMOS sensor technology, the Lightfinder camera technology offers excellent light sensitivity and enables more integration possibilities and more functions.
Also, because the Lightfinder camera technology is digital, it opens a broad range of possibilities, such as the usage of a progressive scan sensor which generates a full frame image – not possible with CCD sensors, and video intelligence analysis.
CMOS sensors also have a faster readout (which is advantageous when high-resolution images are required), lower power dissipation at the chip level, as well as a smaller system size. Megapixel CMOS sensors are more widely available and are less expensive than megapixel CCD sensors.
TOP TIP: Inverse square law
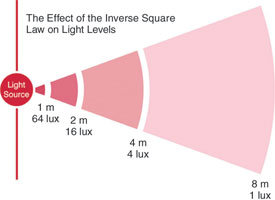
Light obeys the inverse square law and therefore affects CCTV. Light spreads both vertically and horizontally therefore intensity decreases as a square function. If you want to achieve double the distance, you need four times the amount of power.
(An inverse square law is any physical law stating that a specified physical quantity is inversely proportional to the square of the distance from the source of that physical quantity. If light travels double the distance, there will not be ½-power intensity (which would be a linear law) but there will be a ¼ of the original power intensity (a square law).

Practical examples:
* To achieve double (x2) the distance = 4 x the original light power is required (22)
* To achieve triple (x3) the distance = 9 x the original light power is required (32)
Lesson 6: Megapixel cameras and their requirement for light
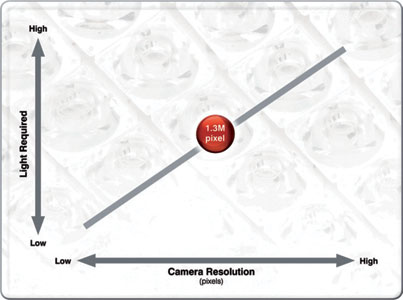
However, much higher megapixel cameras do require more light to achieve high quality images at night. There is one simple rule to remember, if all other variables stay equal – the resolution of a camera increases as its sensitivity to light decreases. This is due to the size of the individual pixels on a sensor (think of the pixel as a little bucket to collect light). Consider the two examples in Figures 4 and 5.


Clearly the sensor on the right with 16 pixels has four times the resolution of the sensor on the left with four pixels. But take a look at the size of the individual pixels on each sensor; the pixels on the sensor on the left are much larger, capable of collecting much more light and are therefore able to deliver better performance in lower light conditions.
Lesson 7: Lower bandwidth and storage
As discussed earlier in this article, street lighting is not enough for high quality images at night – no matter how sensitive to light the camera is. For users of network cameras, if the images captured are noisy or pixilated due to insufficient lighting, compression is unable to work and therefore creates a higher amount of data to be transmitted – increasing bandwidth and storage costs.
Video compression needs good lighting
Compression techniques such as H.264 work on compressing the raw data into smaller ‘chunks’ to reduce bandwidth requirements. In simple terms, compression works by replicating data from previous frames and only the pixels that have changed (due to colour or movement) are transmitted and updated in the live video image.
Most security professionals will be familiar with the noisy 'white-noise' images that cameras produce when there is not enough light on scene. With each pixel changing frequently the camera is fooled into thinking there is constant movement throughout the image and this prevents video compression from working.
A fundamental benefit of professional lighting for network cameras results from delivering enough light to prevent noise in the image. In turn, this provides higher quality pictures, allows compression techniques to work and substantially reduces bandwidth and storage requirements.
Lesson 8: The importance of a quick start and good colour rendition
The test nights revealed that the high performance cameras reacted very quickly to the quick start RAY-LUX White-Light LED illumination. The detail was very impressive and the reaction of the cameras was instant, meaning that they can make it possible for light to be used as both a deterrent and a CCTV tool to capture accurate colour images. It can be forgotten how long it takes for many lighting systems to switch on. This can be critical to the security system. Metal halide lighting can take several minutes to fully warm up, compared with the RAYLUX quick-start LED lighting which was shown to be instant.
Other old style lighting technologies such as halogen and sodium lighting have a poor colour rendition. They produce a dull, uneven orange/yellow glow. This leaves CCTV cameras at a disadvantage, as they are unable to produce high quality, true colour images at night, with enough detail to identify and recognise a target on scene.
Lesson 9: Thermal to detect – IR to identify
Thermal camera technology should not be used instead of IR – but alongside it. Both technologies have different purposes: thermal to detect, infrared to identify.
The test nights showed a practical demonstration using the Axis Dual Head camera. This combines thermal and optical cameras in conjunction with Raytec infrared technology, highlighting how all three technologies can work together to deliver increased security at night.
Often used for distance critical applications, such as border surveillance, port surveillance, protection of critical infrastructure or military projects, thermal technology is often used to detect that a subject is present at great distances, based on detection of a change in temperature. When the subject moves into the zone covered by the infrared illumination, unlike thermal cameras, infrared can be used to identify intruders and pick out details such as facial features or clothing.
Looking at the two thermal images at 100 m (Figure 6), we can see that a person is present, but we cannot tell if the person is a man or a woman or identify any facial features. Now looking at the IR image on the left, we can clearly see that the person is a young/middle aged white male, wearing jeans and a casual jacket.

Conclusion: Testing is critical – there is no substitute for getting out there.
The 2011-2012 winter test nights provided a rare opportunity to try out a range of camera, lens and lighting combinations in real life low-light conditions. This is not always possible, but in reality there is no substitute for getting out there and trying your chosen camera, lens and lighting combination in real conditions. Many systems set up during daytime conditions may fail to achieve effective night-time images.
| Tel: | +27 11 548 6780 |
| Email: | [email protected] |
| www: | www.axis.com |
| Articles: | More information and articles about Axis Communications SA |
© Technews Publishing (Pty) Ltd. | All Rights Reserved.